Artist Showcase,Tips,Tips,Tips,Tips,Tips & Tricks

Featured Artist: Tilson Sister Terrariums

Artist ShowcaseElizabeth Ramos
img_6542

Today's featured artists are two sisters who create these beautiful little terrariums. I was so thrilled when I saw this entry come through. I LOVE terrariums! And these mossy little woodlands are absolutely adorable.

When making the terrariums, they make sure that each piece is unique. They collect the moss, find the perfect container for each terrarium, and then craft and paint each figurine by hand. Although they started out by giving terrariums as gifts to friends and family members, they're now sharing these little gems with everyone else.

I particularly love how they show off the strata of the terrariums by using the apothecary jars to display their work. I think they're like perfect parfaits of earth and moss. And I can't wait to meet these girls at Indie Craft Parade!

img_6583

Featured Artist: Sara Lee Parker Textiles

Artist ShowcaseElizabeth Ramos

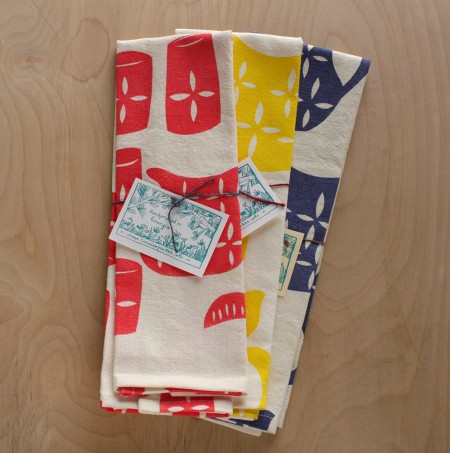
I'm so so excited because today is the first of our featured vendor posts for Indie Craft Parade. We've got such a talented lot, and I know you're going to love browsing the goods they have to offer. So without further ado, meet Sara Lee Parker Textiles. She's a textile printer and designer living just outside of Thomson, GA. She hand prints adorable designs onto sustainable fabrics which she makes into a variety of home goods such as aprons, napkins, and tea towels. (I am such a sucker for those.)

Sara Lee Parker also offers her fabric as yardage and in fat quarter form for sewing, quilting and other DIY projects. If you want to see more, check out her etsy shop. You might not be able to wait till September to purchase from her!

napkins-trio

.

Dinner Napkins

Fabric Samples

Tea Towels

Half Size Apron

Worth a Thousand Words: Impressive Product Photography with Very Few Tools (Part 2)

Tips & TricksElizabeth Ramos

In part one of this photo tip series, we discussed the importance of lighting and staging your products. To wrap things up, we're going to go over some simple principles concerning using your camera and editing your photos.

Working with Your Camera

Regardless of the model of camera you have, you can take good quality photos. Key to achieving this is simply getting to know how your camera works. Read the manual and play with the settings. Also, if you have a popular type of camera, there's a good chance you can find an online forum (such as this one) for trouble shooting.

Here are a couple of good principles to follow regardless the type of camera you shoot with:

1) Check your white balance settings. White balance refers to the neutral colors (such as whites or grays) in your photograph. You want to keep those colors true to real life, creating the most pleasing photos. The white balance is affected by the type of external lighting you have. If the white balance is not adjusted, the picture can appear discolored. See example below.

Adjusting the white balance is simple. Go into your camera's white balance settings and adjust the light setting to match the conditions you're shooting in.

2) Use a tripod. I don't care how steady you think you're hands are. Any movement in the camera will result in a lesser quality photo.

3) Keep the ISO on your camera low.  A lower ISO will slow down your shutter speed, but the image will be less grainy. Most digital cameras have an ISO adjustment. If yours does, keep it as low as possible for the kind of light you're shooting in.

Editing Your Photos

Before you upload your product photos right out of the camera, consider these suggestions to put the finishing touches on your photos.

1) Crop your photos. There's usually not a need for a lot of background or white space around your object. Make clear what's being sold, and keep the attention away from what's surrounding your product. Depending on the item you're shooting, it might be a good idea to keep the focus of the picture away from the direct center. Try to crop it on the 2/3 line for a pleasing effect.

2) Sharpen and brighten your images as necessary. If your photo turns out a little darker or less clear than you like, these are good ways to achieve the pleasing effects you want. I know that can sound a little daunting if you have no photo editing experience. So I highly recommend checking out Picnik. It's a free online photo editing program that will do most of the work for you. You can either play with your photos settings yourself or use the auto-fix feature that does a really good job. The program is easy to follow and quite fun when you see the end result.

Just a final word of advice, keep practicing and playing with your product photos. You'll soon find the exact look you want, and the process will become faster and easier as you go.