We've had such an incredible response to Emily's DIY Chalkboard Lettering a couple of weeks ago, I couldn't wait to put up a new guest blog post from another talented lady. Today I'm introducing Savannah Wallace from Maiedae--an artistic, fashion, and lifestyle blogger. Two years ago Savannah and her business partner Jenny participated in Indie Craft Parade as jewelry artists, and I've been mesmerized with their work ever since. Besides her work in jewelry, Savannah is also a graphic designer and photographer. I've been pestering Savannah to do a guest blog post, and fortunately, her busy schedule has allowed her to share this adorable tutorial with us. Thank you, Savannah!
** ** ** ** ** ** ** ** ** ** ** ** ** ** ** ** ** ** ** ** ** ** ** ** ** ** ** ** ** ** ** ** ** ** ** ** ** ** **
DIY: UPCYCLING VINTAGE CRATES & BOXES
Hello friends! Savannah from
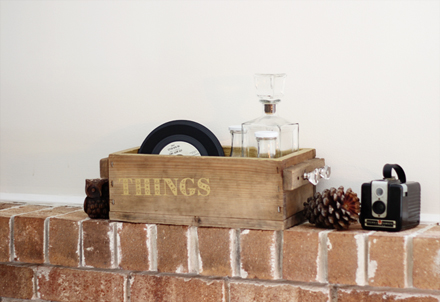
here to share with you a simple DIY and tips on up-cycling your vintage crates and boxes. Last year I spent some treasure hunting time at local antique stores in search for wooden finds. I found old coca-cola crates, small wooden boxes and a few larger crates. I built up my little collection and have found over the past year that they've served for many uses! I used them as display pieces for my handmades at a craft show, stacked them together to make night stands for my husband's and my pallet bed, put plants on them outside and used them for pretty storage. Today's DIY shows how I used simple elements to up-cycle one of my favorite wooden boxes as a "free for all" things box.
SUPPLIES
* Multi-surface paint - I used Martha Stewart's metallic gold paint.
* Stencil or silk screen - I found a great selection of stencil pieces and some beautiful Martha Stewart silk screen letters at Michael's. You can find things like this at your local craft shop.
* Dresser knobs.
STEP BY STEP
1. Using a drill, make holes into your wooden piece for knobs or hooks. Use these to hang your keys, add a little visual interest or hang other treasured items from.
2. Paint the inside of your crate with a color of your choice to give your box/crate dimension and a little pop or color or metallic flair.
3. Stencil a word or pattern on your box to match its use.
Just by getting a little creative you can easily up-cycle any of your favorite wooden antiqued pieces and give it a little extra charm! Try using your favorite colors, fun stencil patterns and trying it out in different places in your home. I love that my "things" box can be used for mail, main floor nick-nacks, make-up and bathroom supplies. So many uses and way more attractive than a plastic bin.
Thanks for having me! Stay warm.
-Savannah
















![00roses[7]](https://images.squarespace-cdn.com/content/v1/54110a3ce4b04a48b9aa8bf1/1428320382722-IR6SGDU3YSD85OTXUASJ/00roses7-e1318602883538.jpg)


