Projects,Tours,Tours,Tours,Tours,Tours

Upcycling Vintage Crates and Boxes from Maiedae

Artist Showcase, ProjectsElizabeth Ramos

We've had such an incredible response to Emily's DIY Chalkboard Lettering a couple of weeks ago, I couldn't wait to put up a new guest blog post from another talented lady. Today I'm introducing Savannah Wallace from Maiedae--an artistic, fashion, and lifestyle blogger. Two years ago Savannah and her business partner Jenny participated in Indie Craft Parade as jewelry artists, and I've been mesmerized with their work ever since. Besides her work in jewelry, Savannah is also a graphic designer and photographer. I've been pestering Savannah to do a guest blog post, and fortunately, her busy schedule has allowed her to share this adorable tutorial with us. Thank you, Savannah!

** ** ** ** ** ** ** ** ** ** ** ** ** ** ** ** ** ** ** ** ** ** ** ** ** ** ** ** ** ** ** ** ** ** ** ** ** ** **

DIY: UPCYCLING VINTAGE CRATES & BOXES

Hello friends! Savannah from 

Maiedae

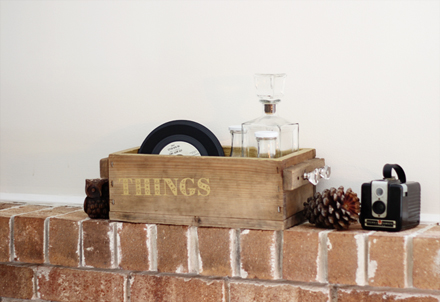
 here to share with you a simple DIY and tips on up-cycling your vintage crates and boxes. Last year I spent some treasure hunting time at local antique stores in search for wooden finds. I found old coca-cola crates, small wooden boxes and a few larger crates. I built up my little collection and have found over the past year that they've served for many uses! I used them as display pieces for my handmades at a craft show, stacked them together to make night stands for my husband's and my pallet bed, put plants on them outside and used them for pretty storage. Today's DIY shows how I used simple elements to up-cycle one of my favorite wooden boxes as a "free for all" things box.

SUPPLIES

* Multi-surface paint - I used Martha Stewart's metallic gold paint.

* Stencil or silk screen - I found a great selection of stencil pieces and some beautiful Martha Stewart silk screen letters at Michael's. You can find things like this at your local craft shop.

* Dresser knobs.

STEP BY STEP

1. Using a drill, make holes into your wooden piece for knobs or hooks. Use these to hang your keys, add a little visual interest or hang other treasured items from.

2. Paint the inside of your crate with a color of your choice to give your box/crate dimension and a little pop or color or metallic flair.

3. Stencil a word or pattern on your box to match its use.

IMG_2721small
IMG_2721small
IMG_2722

Just by getting a little creative you can easily up-cycle any of your favorite wooden antiqued pieces and give it a little extra charm! Try using your favorite colors, fun stencil patterns and trying it out in different places in your home. I love that my "things" box can be used for mail, main floor nick-nacks, make-up and bathroom supplies. So many uses and way more attractive than a plastic bin.

Thanks for having me! Stay warm.

-Savannah
DIY Chalkboard Lettering with Emily Jeffords

Artist Showcase, ProjectsElizabeth Ramos

We've said this before, but one of the best things about Indie Craft Parade is getting to know the awesome people in the maker community. These connections can provide new friendships, networking connections, business opportunities, and they always supply creative inspiration. For this guest post, we called in one of the amazing connections we've made---the ever lovely Emily Jeffords

We asked Emily to supply a project for us...and she did something awesome: DIY CHALKBOARD LETTERING. This is an amazing idea. Who doesn't love beautifully hand lettered designs? And now you can do it yourself!

So without further ado, take it away, Emily!

** ** ** ** ** ** ** ** ** ** ** ** ** ** ** ** ** ** ** ** ** ** ** ** ** ** ** ** ** ** ** ** ** ** ** ** ** ** **

Hello!  I’m so happy to be guest blogging for one of my favorite groups, Indie Craft Parade!  I’m sure you have noticed the growing chalkboard lettering craze sweeping America and Europe right now.  It’s pretty awesome.  Well, it’s awesome if you have freakishly amazing handwriting (which I don’t!)  I can barely write an address on an envelope with grace. Sadly, I’m going to have to leave the hand-lettering to the likes of Dana Tanamachi and Molly Jaques.

The good news: those of us who aren’t Dana Tanamachi can still have amazing chalkboards with freakishly amazing typography and precision (we just need a teensy bit of help from the computer….  Shhh.)

Oh, and lefties, you’re in luck.  Because you don’t have to do one bit of writing, you can work from right to left!  You should have seen me working on this baby upside down, sideways, and backwards!

This chalkboard DIY is so stylish, so trendy, and so, so easy.

Things I leaned during this DIY:

1. Chalkboard spray paint is a total joke.  Just use flat black paint and mix in a tiny bit of clear gesso or unsanded tile grout.  I didn’t try the paint can variety.  Maybe it’s amazing? 2. Really, really, really cover the paper with chalk.  It will save you so much time in the long run. 3. You might want to do a few words with larger text…  not going to lie, this took quite a while because my text was so small (and I’m a bit of a perfectionist.) 4. A small paintbrush + water is like a magic eraser.

I hope this inspires you to have fun creating something amazing and original.

DIY Round Up: Handmade Notebooks

ProjectsElizabeth Ramos

Well we haven't done a crafty round up since before the festival, so I'm really excited to share what I'm finding inspiring right now. I've recently been hunting for the perfect notebook. Pads of paper that fall apart just aren't cutting it anymore. I love, love the designs coming out of Rifle Paper Company, but I think I might be good and make one myself...we'll see. I think these notebooks might be right up my alley, maybe yours too. The tutorial for this little journal/notebook from Elle's Studio looks simple enough but still super cute. They used patterned paper and chipboard to create a book that would also make a great album or daily scrapbook.

Screen shot 2012-10-03 at 2.48.43 PM

Magenta and Gold? Yes, please! Whitney of Eat, Sleep, Cuddle used scrapbook paper and gold leaf to make this awesome design.

OLYMPUS DIGITAL CAMERA

Making a stamp from a lino block is a great way to create some one of a kind art as well as a functional piece. Check out the tutorial from A Pair of Pears.

Or, if you want to go super basic and still say, "I made this," then this kit from Curious Doodles could be perfect from you. The embroidery is just awesome, and the book is the perfect size.

DIY Round Up: Pet Accesories

ProjectsElizabeth Ramos

We like to put handmade touches on all aspects our lives. Why shouldn't that apply to our pets as well? Give your pets a little handmade love this weekend, and get crafty with something you know they'll enjoy. Cats and kittens just want a hole to cuddle up and hide in. So why not make it a cute cubby like this one from Eilen Tein. (English knitting pattern at the bottom of the post.)

Always forget to bring the plastic baggies on the walk? Make your pet carry his own. This cute collar pouch tutorial from The B-Line.

Love this adorable dog bed DIY from My So Called Crafty Life.

Love cute treat bins, but don't want to pay the designer price? Tidy Mom managed to make this cute tin for just a couple of bucks. Works for pets of all shapes and sizes.

I really do enjoy having my cat chase me around the house as I drag a string in front of her. I'm looking forward to making something cute for her to catch. Tutorial from Martha Stewart.

My heart really does go out to people (especially kids) who can't have a pet because of allergy or space reasons. So I think this fun make-your-own pet tutorial could be a way to get your kids crafting and to give them a pet of their own. Make your own jellyfish in a bottle from Bhoomplay's Blog.

DIY Roundup: Ombre Dyeing

ProjectsElizabeth Ramos

Ombre dyeing continues to be a trend in the fashion, craft, and decor scenes, and why not? Ombre done right can yield the most beautiful, artsy results. So, here's a small collection of DIY ombre projects to get you inspired. With a little time and patience (and guidance from these great tutorials), you too can create the trendy ombre products you've seen. Ombre dyed ballet flats from Swell Mayde.

Paper gift tags from Momtastic.

chrysanthymum-lantern640

A giant chrysanthemum--perfect for parties-- from Aunt Peaches.

Of course, no round up for ombre dyeing would be complete without a tee shirt tutorial, like this one from A Pair and A Spare.

Then to finish things up, these lovely ombre napkins from Camille Styles. These are actually spray dyed.

Have you experimented with ombre dyeing? We'd love to hear about it!! Email photos and stories to jen@indiecraftparade.com.

Handmade Business Cards

ProjectsElizabeth Ramos

Every artist or crafter needs business cards! Why not show off your talent from the start and make a memorable impact with a handmade or hand-embellished card? Here's a few of our favorites.

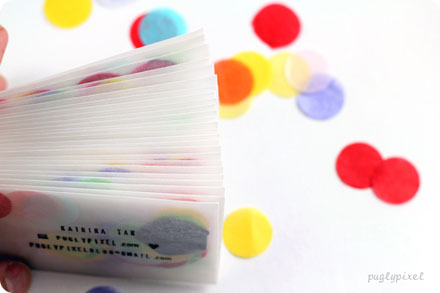
Stamped glassine envelopes filled with confetti, what fun! By PuglyPixel (with DIY tutorial)

Stamped kraft cardstock with brass tag embellishment. By oh, hello friend (with DIY tutorial)

Offset stamped cardstock. Via MaeMae Paperie

Sewn fabric strips embellish these printed cards. By Craftoholics Anonymous

Tiny kraft envelopes, stamped! By Hey Look

Gilded edges dress up these simple printed cards. By Camille Styles (with DIY tutorial)

These printed cards are embellished with washi tape, twine, and a hole punch. By Mint

Watercolored card with the printed info stitched on. By Ethan Martin Have you designed a unique business card? We'd love to see it!

String Art

ProjectsElizabeth Ramos

We've been loving all the string art that's popping up lately. Here's some of our favorites from around the web!

We Are All Apart Of The Same Thing by Dominique Falla (see his post for gorgeous detail shots)

Drawn Pink by Anne Lindbeg for The Bemis Center

Artist unknown, from the Heide Museum of Modern Art

Embroidered photographs by Maurizio Anzeri

Want to try your hand at creating your own string art? Here's a couple DIY projects with tutorials.

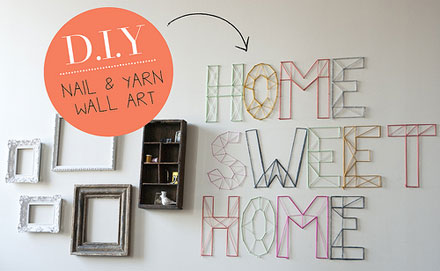
Lettered Wall Art, tutorial by Jen Lula

Geometric String Escort Cards, tutorial by Oh Happy Day

DIY Round Up: Easy Kitchen Updates

ProjectsElizabeth Ramos

What are your weekend plans? The weather looks very promising in Greenville, so I know I'll be outside for sure...hopefully joining friends for a couple exciting Greenville events. Both Artisphere and the Greenville Urban Farm Tour are this weekend, and I want to take full advantage of both. Outside that, it sure would be nice to get some kitchen updates underway. Today's round up features 4 incredibly easy ways to add a little interest to the room we spend a ton of time in. Love this rainbow of spoons painted and covered with food save shellac, as demonstrated on Little Bit Funky.

The broom is definitely my weapon of choice when it comes to keeping a clean kitchen, so why not follow House of Ernest's lead and make it pretty. 

It's fairly easy to find nicely patterned cloth napkins on the cheap, but they still lack the punch of the napkins found in high end boutiques and kitchen stores. The Fab Miss B found these inexpensive napkins at Target and quickly spruced them up with thrifted pom pom and lace trim.

And finally, I just love these tins turned refrigerator holders. As created on A Pretty Cool Life, they're an adorable way to keep that fridge tidy.

Happy (almost) weekend!

Easter Crafts Round Up

ProjectsElizabeth Ramos

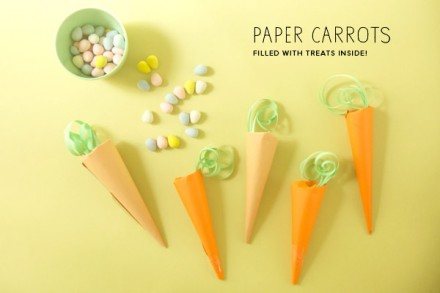
Easter might just be a few days away, but there's still time to think about cute crafts to do with or for the family. Here's a round up of easy tutorials that we find particularly perfect for the season. Simple paper carrots from Oh Happy Day. Perfect for table settings or stuffing in Easter baskets.

Skip the jars of food coloring this year when you dye Easter eggs. Use ingredients you already have in your kitchen to produce these gorgeous natural dyes. Tutorial from The Kitchn.

Have kids or having kids over for Easter dinner? Make these bunny ears ahead of time for them to play and pose with. Family pictures will never be cuter. Featured in Country Living.

Finally, these adorable treat bags from Mer Mag are sure to delight Easter guests young and old alike.

DIY Garden Projects (and more) Round Up

ProjectsElizabeth Ramos

It's been a while since we've done a crafty DIY round up on our blog, so I'm pretty excited to have one all about gardening. I'm hoping the clear forecast tomorrow holds, because I want to spend the entire day outside! Ok, maybe you don't have a green thumb and hate working in the yard. Don't tune me out yet. I've got more than just a post about garden projects. Check out these beauties below.

I love terrariums, especially this one from In Words and Pictures. And these little Tillandsia (air plants) are so easy to take care of. They hardly need any attention.

No yard? Have a porch or patio that needs a little plant love? Apartment Therapy's tutorial for recycling pallets into vertical gardens is pure genius. This would be perfect for growing small flowers, or my personal favorite, fresh herbs.

Ok, maybe you don't have a green thumb, but who doesn't love fresh flowers in the house? Especially when they're displayed in this faux mercury glass vase from Pepper Design.

MDP_DIY_hangingPlanter2

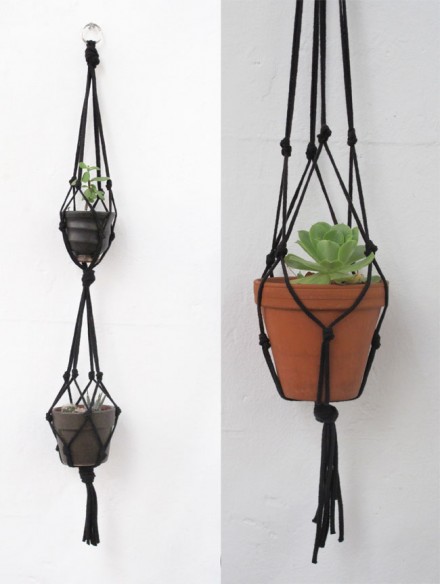
Or maybe hanging plants are your thing? I love how you can give some distinction to plain ol' terra cotta with this tutorial from More Design Please.

And finally, have any friends who are nuts about gardening? This is a super cute favor or hostess gift for those who have that green thumb. Template found on Ruffled Blog.

Happy Weekend!

Handmade Valentines Round Up

ProjectsElizabeth Ramos

Valentine's Day is just a week away, which means you still have plenty of time to whip out the scissors, glue, and glitter to make your own hand made valentines! Just in case you're feeling dry for inspiration, we've included a few ideas that might get you started--complete with templates and tutorials. Happy Crafting!

No better way than to start your valentine's day than with a custom cup of coffee. I think I might fill my valentine's cup with this Nutty Mocha Latte. Find the free printable coffee sleeve at Eat Drink Chic.

Have treats that need a package? Love this fabric envelope tutorial from Sew, Mama, Sew! (Love their fabric selection too!)

Play cupid with these handmade wooden arrows from Design*Sponge.

This pirate printable from mer mag is adorable. So easy to add the felt and stitching--and a perfect card to make for (or with) your kids!

Fold out cards from Martha Stewart might require a little more precision and time, but your valentine will be so delighted with the attention to detail.

Finally, if Valentine's Day decoration is more you style, this awesome compilation featured on Design*Sponge is just the thing for you.

XOXOXO

DIY Geometric Accessories Round Up

ProjectsElizabeth Ramos

I really have a design crush on all of the geometric designs that are popular right now. They're clean and fresh--and facets just make me smile. For instance, I would buy the hand built ceramic hanging planter (pictured above) from Pigeon Toe Ceramics in a heartbeat.

But since we don't all have ceramic studios where we can just make (or buy) faceted creations like this, I've pulled together some very feasible geometric accessory projects.

Let's start with this diamond shaped leather necklace from Oh the Lovely Things.

And then the lovely catch-all pouch from Dismount Creative.

You really should check out this template/tutorial for geometric garland featured on Urban Outfitters.

And finally, another tutorial from Dismount Creative (she has a lot of good ones!) I love this pendant and will be making it soon!

Happy Weekend!

DIY Round Up: Jewelry Holders

ProjectsElizabeth Ramos

How many of you (like me) resolve each New Year to keep a better organized life? I've created a whole list of house, yard, and general life projects to keep me going through 2012. However, I don't want all my tasks to be drudge work (i.e., cleaning out the fridge more often). I've resolved to keep things ship-shape in a fashionable and functional way--creative hooks, repurposed wire baskets, refurbished storage units and the like. Or, take a look at these DIY jewelry holders I've collected as reference. I could certainly use any of these to keep all my Indie Craft Parade finds/treasures in order. These three DIY projects have great tutorials, and could totally be finished in a weekend using thrifted or salvaged materials. The weather here in Greenville is gorgeous this weekend. It's days like these that make me hopeful to keep my New Year's resolutions. We'll see how far I get.

A lovely repurposed type drawer from Tonya Staab.

Earring organizer using old frames and thick wire mesh from Dream Green DIY.

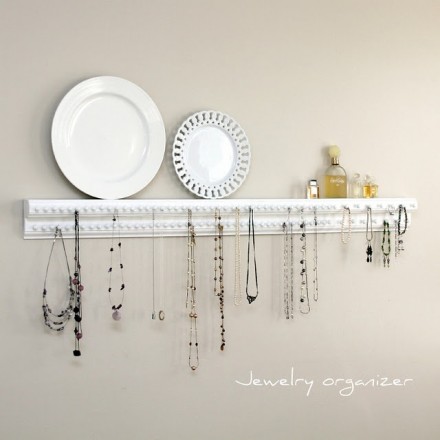
Necklace rack/display shelf made with a few materials from the hardware store from A Grateful Prayer and a Thankful Heart.

Handmade Christmas Centerpieces

ProjectsElizabeth Ramos
img35l

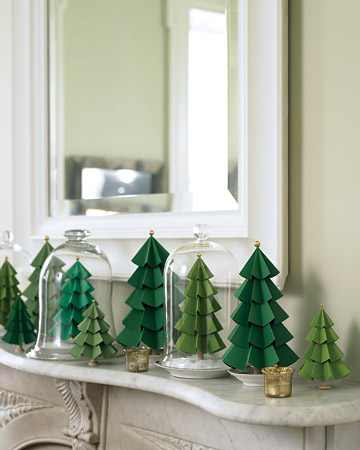
I can't believe Christmas is just a few days away! I still have so much to do. Fortunately, my centerpieces for a big Christmas dinner are already made. There will be a little forest of handmade Christmas trees--so festive! I gathered my projects from the round up below. Hope this will provide some last minute handmade inspiration for you as well! Twine wrapped tress from The Thrifty Crafter.

Wax paper tree from Bower Power.

Paper evergreens from Martha Stewart.

Scrapbook cone trees fromBetter Homes and Gardens.

Crepe paper trees from Creative Chaos.

Thanksgiving DIY Round Up

ProjectsElizabeth Ramos

Thanksgiving is my favorite holiday. I love that it's not over commercialized. I love the time spent with family. I love the traditions we've made over the years--Oh and the food. This girl has a Southern family that can cook like nobody's business. Perhaps the only thing I don't love is our lack of great decor for the Thanksgiving holiday. Admittedly, I put so much more effort into decorating for Christmas, that I feel Thanksgiving gets ignored. Well, not this year. I've got just over a week till turkey day, and I'm loving some of these DIY projects I'm sharing today. I hope you will find these as inspiring as I do!

These linen napkins from The Purl Bee seem so easy to make, and I think they're quite beautiful with this ombre look.

I've seen a lot of ways that people count and record their blessings, but this might be my favorite. I love how the tutorial from Craftzine.com uses chalkboard paint "leaves" for Thanksgiving guests to write on. I think this project would be especially fun for kids to get involved.

I love this idea as an alternative to place cards. Elizabeth Anne Designs salvaged vintage spoons and hammered guests' names into them. They look so pretty with a finished table setting.

Ok, I've seen countless cake toppers. But a pretty pie topper--Who knew? I think pies are generally under-appreciated, and this swag from Oh Happy Day just makes me smile.

DIY Round Up: Scrap Fabric Projects

ProjectsElizabeth Ramos

Happy weekend everyone! I've got a DIY round up today that's particularly dear to my heart. I love fabric. I practically collect it, which gets me into trouble particularly when I piles of scraps to deal with. I can't throw them away. There's always something more that you can squeeze out of them. So while jewelry making is usually the fate of my scraps, I've come across a number of adorable projects that might require me to dig deeper into the scrap bin. If you don't have a fabric fetish like me, you probably still don't need to go out and by any for these projects. Old tee shirts, blouses, sweaters and even neckties usually make crafting fabric.

Craft away!

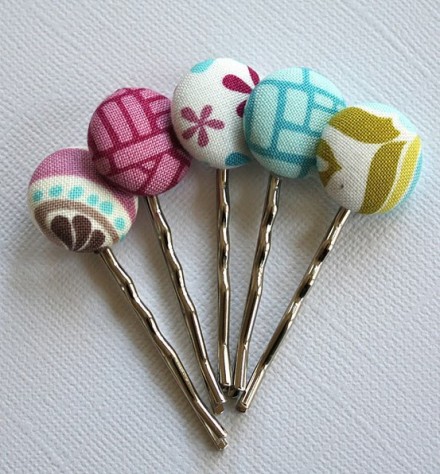
How cute are these covered bobbies? You'll have to buy the hardware for this project, but this tutorial from Christina Williams spells everything out nicely.

These fabric feathers featured on 100 layer cake are easy to make and so versatile. They'd look great as hair pins, gift wrap embellishments or little pops of texture in a flower arrangement.

Need a functional and still cute way to contain your fabric scraps (or anything else for that matter)?  The Sometimes Crafter put together a great tutorial that will keep you from using your good tupperware to organize your odds and ends.

Tattered fabric roses, though not a new craft, still have an elegant charm. My favorite thing about them: you can use them to customize just about anything. Pin them onto bags or coat lapels; stitch them onto cardigans or scarves. Everyone will be amazed when they find out you did it yourself. Tutorial found on Everyday Chaos.

Autumn Craft Round Up

ProjectsElizabeth Ramos

Happy first day of fall everyone! This is officially my favorite season. I love it all--the colors, the fashion, the food. And I totally plan on spending part of my weekend making some autumn inspired crafts. Here's a few great ones to consider. Have a great crafting weekend!

Fabric pumpkins from ever creative Martha Stewart team. I love the color combination of plum, velvet, and metallic fabrics.

Leather leaves necklace--a super cute DIY from Missie Krissie

Not your average book-pressed wildflowers. I love the combination of the pressed flower with vintage book page and frame. Tutorial courtesy of Country Living.

Have acorns scattered across your yard? Turn them into a wreath for your front door. I love the brilliant green color Katie Miller chose to paint the acorns.

DIY Round Up: Fun Paper Crafts

ProjectsElizabeth Ramos

I don't know what your plans are for this weekend, but mine will be spent crafting up a storm for a friend's wedding. I'm making a paper and vellum garland, which I'll show you at a later date. But all my work with paper inspired me to share a few paper more paper crafts that I'd love to tackle. Hopefully you'll find some time to craft this weekend...particularly if the crazy hot South Carolina weather continues to keep us all in doors.

Recycling paper bags and other odds and ends into cute, cute wrapping paper; Courtesy of A Creative Mint.

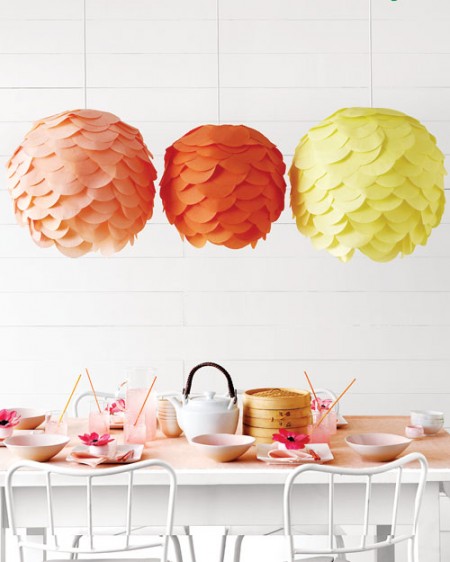
Decorative Paper Lanterns; Courtesy of Martha Stewart.

Dip Dye Paper Cups; Courtesy of Design*Sponge.

Do It Yourself: Creative Wall Covering

ProjectsElizabeth Ramos

New DIY Project for you. I learned  about this one while at the craft night we hosted a couple of weeks ago. Melinda, one of our participants, recently moved, and she was looking for a creative way to fix an unsightly wall in her bedroom. The previous renter had torn up the some of the wall, and there were bits of peeling paint all over the surface. So Melinda came up with the bright idea of using this tutorial to make tissue paper flowers from vintage sewing patters. Compiling the flowers with other odds and ends from the thrift store, she put together quite a lovely display and managed to cover any ugly splotches in the process. Thanks for sharing the paper flowers and the finished product!

Making the paper flowers at the Etsy Craft Party.

P1130083

The Materials:

Various sizes of tissue paper flowers

Thrifted frames (contents and glass removed), spray painted a pearly off-white--some of the frames she filled with coordinating craft paper which turned out super cute!

Small nails for hanging the frames--1" nails for lightweight, empty frames work fine

Wall safe sticky tack--a tiny bit for holding the edges of the frames level

A level

Thumb tacks

Blogshot1

The wall, tastefully covered.

The Process:

First Melinda laid out all of the frames on the floor to see which arrangement she liked best. It's always a good idea to play with composition before you start nailing things to the wall. After she tacked the frames in place and made sure they were level, she thumbtacked the paper flowers over the nasty wall splotches to hide remaining evidences of peeling paint. The entire project was quite easy, about 4 hours from start to finish. And it looks absolutely great!

Do It Yourself: Herb Gardening

ProjectsElizabeth Ramos

The DIY ethic is the heart of America's craft movement. This ever growing spirit of "I can do that" inspires people to better living where they waste less and frequently spend less. Indie Craft Parade whole heartedly embraces ventures that help people become more independent, so we're going to include a series of posts where we help you make your own accessories and home decor, or enhance your life using tools you already have, or as in today's post, help you grow your own food. Now I'm not talking about becoming independent of the food industry or even digging up your backyard to plant a full vegetable garden. We're starting at the simplest level of food provision--planting an herb garden.

Photos courtesy of this post from the very inspiring photography blog From Me to You.

I love herbs! I have a small container garden just off our back porch, and few things make me happier in the summer than clipping off those fragrant greens to stir into dinner at the last minute. The best thing is, many herbs are ridiculously easy to take care of (even for us with the blackest of thumbs), and making a little container garden is so stinking cheap! For the price of buying fresh herbs at the grocery store, you can make an herb planter that will last you the entire season. Herbs also provide some basic health benefits. They're a great way to add flavor while cutting back on fats and salt.

You probably already have most (if not all) of the materials you need for starting your own herb garden. But here is a basic list:

1) Small containers--at least 6" in diameter so your plants have room to grow (recycled cans with holes poked in the bottom work great if you don't already have cast off flower pots)

2) Fine potting soil

3) Seeds or starter plants--this late in the season, I would definitely recommend starter plants

4) A sunny spot such as a porch, patio, or even a window sill that receives a few hours of good sunlight every day

5) Watering device--herbs don't need a ton of water, but they do like to have it consistently (if you want to get all fancy, you can buy an inexpensive watering systems at your local hardware store)

Now, I'm by no means a knowledgable gardener, but I have had great luck with my herbs. Here is a list of herbs that I have found to grow well in the hot summers of South Carolina: Basil, Rosemary, Oregano (mine comes back year after year now), Thyme, Parsley, Tarragon, and Mint. I have NOT had any luck with Cilantro or Chamomile. I think the heat just does them in too early in the season.

Hopefully you're inspired to go out and try a little gardening of your own. Here are a few parting tips that will make your experience even better.

If you don't mind doing a little research, the Clemson Extension website has this awesome guide on growing and harvesting a variety of herbs.